Tutorial: Build a todo manager
In this tutorial, we will build a todo manager MCP server with user authentication and authorization.
After completing this tutorial, you will have:
- ✅ A basic understanding of how to set up role-based access control (RBAC) in your MCP server.
- ✅ A MCP server that can manage personal todo lists.
Overview
The tutorial will involve the following components:
- MCP server: A simple MCP server that uses MCP official SDKs to handle requests, with an integrated Todo service for managing user's todo items.
- MCP inspector: A visual testing tool for MCP servers. It also acts as an OAuth / OIDC client to initiate the authorization flow and retrieve access tokens.
- Authorization server: An OAuth 2.1 or OpenID Connect provider that manages user identities and issues access tokens.
Here's a high-level diagram of the interaction between these components:
Understand your authorization server
Access tokens with scopes
To implement role-based access control (RBAC) in your MCP server, your authorization server needs to support issuing access tokens with scopes. Scopes represent the permissions that a user has been granted.
- Logto
- OAuth 2.0 / OIDC
Logto provides RBAC support through its API resources (conforming RFC 8707: Resource Indicators for OAuth 2.0) and roles features. Here's how to set it up:
-
Sign in to Logto Console (or your self-hosted Logto Console)
-
Create API resource and scopes:
- Go to "API Resources"
- Create a new API resource named "Todo Manager"
- Add the following scopes:
create:todos: "Create new todo items"read:todos: "Read all todo items"delete:todos: "Delete any todo item"
-
Create roles (recommended for easier management):
- Go to "Roles"
- Create an "Admin" role and assign all scopes (
create:todos,read:todos,delete:todos) - Create a "User" role and assign only the
create:todosscope
-
Assign permissions:
- Go to "Users"
- Select a user
- You can either:
- Assign roles in the "Roles" tab (recommended)
- Or directly assign scopes in the "Permissions" tab
The scopes will be included in the JWT access token's scope claim as a space-separated string.
OAuth 2.0 / OIDC providers typically support scope-based access control. When implementing RBAC:
- Define your required scopes in your authorization server
- Configure your client to request these scopes during the authorization flow
- Ensure your authorization server includes the granted scopes in the access token
- The scopes are usually included in the JWT access token's
scopeclaim
Check your provider's documentation for specific details on:
- How to define and manage scopes
- How scopes are included in the access token
- Any additional RBAC features like role management
Validating tokens and checking permissions
When your MCP server receives a request, it needs to:
- Validate the access token's signature and expiration
- Extract the scopes from the validated token
- Check if the token has the required scopes for the requested operation
For example, if a user wants to create a new todo item, their access token must include the create:todos scope. Here's how the flow works:
Dynamic Client Registration
Dynamic Client Registration is not required for this tutorial, but it can be useful if you want to automate the MCP client registration process with your authorization server. Check Is Dynamic Client Registration required? for more details.
Understand RBAC in todo manager
For demonstration purposes, we'll implement a simple role-based access control (RBAC) system in our todo manager MCP server. This will show you the basic principles of RBAC while keeping the implementation straightforward.
While this tutorial demonstrates RBAC-based scope management, it's important to note that not all authentication providers implement scope management through roles. Some providers may have their own unique implementations and mechanisms for managing access control and permissions.
Tools and scopes
Our todo manager MCP server provides three main tools:
create-todo: Create a new todo itemget-todos: List all todosdelete-todo: Delete a todo by ID
To control access to these tools, we define the following scopes:
create:todos: Allows creating new todo itemsdelete:todos: Allows deleting existing todo itemsread:todos: Allows querying and retrieving the list of all todo items
Roles and permissions
We'll define two roles with different levels of access:
| Role | create:todos | read:todos | delete:todos |
|---|---|---|---|
| Admin | ✅ | ✅ | ✅ |
| User | ✅ |
- User: A regular user who can create todo items and view or delete only their own todos
- Admin: An administrator who can create, view, and delete all todo items, regardless of ownership
Resource ownership
While the permission table above shows the explicit scopes assigned to each role, there's an important principle of resource ownership to consider:
- Users don't have the
read:todosordelete:todosscopes, but they can still:- Read their own todo items
- Delete their own todo items
- Admins have full permissions (
read:todosanddelete:todos), allowing them to:- View all todo items in the system
- Delete any todo item, regardless of ownership
This demonstrates a common pattern in RBAC systems where resource ownership grants implicit permissions to users for their own resources, while administrative roles receive explicit permissions for all resources.
To dive deeper into RBAC concepts and best practices, check out Mastering RBAC: A Comprehensive Real-World Example.
Configure authorization in your provider
To implement the access control system we described earlier, you'll need to configure your authorization server to support the required scopes. Here's how to do it with different providers:
- Logto
- OAuth 2 / OIDC
Logto provides RBAC support through its API resources and roles features. Here's how to set it up:
-
Sign in to Logto Console (or your self-hosted Logto Console)
-
Create API resource and scopes:
- Go to "API Resources"
- Create a new API resource named "Todo Manager" and using
http://localhost:3001as the resource indicator.- Important: The resource indicator must match your MCP server's URL. For this tutorial, we use
http://localhost:3001since our MCP server runs on port 3001. In production, use your actual MCP server URL (e.g.,https://your-mcp-server.example.com).
- Important: The resource indicator must match your MCP server's URL. For this tutorial, we use
- Create the following scopes:
create:todos: "Create new todo items"read:todos: "Read all todo items"delete:todos: "Delete any todo item"
-
Create roles (recommended for easier management):
- Go to "Roles"
- Create an "Admin" role and assign all scopes (
create:todos,read:todos,delete:todos) - Create a "User" role and assign only the
create:todosscope - In the "User" role's details page, switch to the "General" tab, and set the "User" role as the "Default role".
-
Manage user roles and permissions:
- For new users:
- They will automatically get the "User" role since we set it as the default role
- For existing users:
- Go to "User management"
- Select a user
- Assign roles for the user in the "Roles" tab
- For new users:
You can also use Logto's Management API to programmatically manage user roles. This is particularly useful for automated user management or when building admin panels.
When requesting an access token, Logto will include scopes in the token's scope claim based on the user's role permissions.
For OAuth 2.0 or OpenID Connect providers, you'll need to configure the scopes that represent different permissions. The exact steps will depend on your provider, but generally:
-
Define scopes:
- Configure your authorization server to support:
create:todosread:todosdelete:todos
- Configure your authorization server to support:
-
Configure client:
- Register or update your client to request these scopes
- Ensure the scopes are included in the access token
-
Assign permissions:
- Use your provider's interface to grant appropriate scopes to users
- Some providers may support role-based management, while others might use direct scope assignments
- Check your provider's documentation for the recommended approach
Most providers will include the granted scopes in the access token's scope claim. The format is typically a space-separated string of scope values.
After configuring your authorization server, users will receive access tokens containing their granted scopes. The MCP server will use these scopes to determine:
- Whether a user can create new todos (
create:todos) - Whether a user can view all todos (
read:todos) or only their own - Whether a user can delete any todo (
delete:todos) or only their own
Set up the MCP server
We will use the MCP official SDKs to create our todo manager MCP server.
Create a new project
- Node.js
Set up a new Node.js project:
mkdir mcp-server
cd mcp-server
npm init -y # Or use `pnpm init`
npm pkg set type="module"
npm pkg set main="todo-manager.ts"
npm pkg set scripts.start="node --experimental-strip-types todo-manager.ts"We're using TypeScript in our examples as Node.js v22.6.0+ supports running TypeScript natively using the --experimental-strip-types flag. If you're using JavaScript, the code will be similar - just ensure you're using Node.js v22.6.0 or later. See Node.js docs for details.
Install the MCP SDK and dependencies
- Node.js
npm install @modelcontextprotocol/sdk express zod mcp-auth dotenvOr any other package manager you prefer, such as pnpm or yarn.
Create the MCP server
First, let's create a basic MCP server with the tool definitions:
- Node.js
Create a file named todo-manager.ts and add the following code:
// todo-manager.ts

import { z } from 'zod';
import { McpServer } from '@modelcontextprotocol/sdk/server/mcp.js';
import { StreamableHTTPServerTransport } from '@modelcontextprotocol/sdk/server/streamableHttp.js';
import express, { type Request, type Response } from 'express';

// Create an MCP server
const server = new McpServer({
  name: 'Todo Manager',
  version: '0.0.0',
});

server.tool('create-todo', 'Create a new todo', { content: z.string() }, async ({ content }) => {
  return {
    content: [{ type: 'text', text: JSON.stringify({ error: 'Not implemented' }) }],
  };
});

server.tool('get-todos', 'List all todos', async () => {
  return {
    content: [{ type: 'text', text: JSON.stringify({ error: 'Not implemented' }) }],
  };
});

server.tool('delete-todo', 'Delete a todo by id', { id: z.string() }, async ({ id }) => {
  return {
    content: [{ type: 'text', text: JSON.stringify({ error: 'Not implemented' }) }],
  };
});

// Below is the boilerplate code from MCP SDK documentation
const PORT = 3001;
const app = express();

app.post('/', async (request: Request, response: Response) => {
  // In stateless mode, create a new instance of transport and server for each request
  // to ensure complete isolation. A single instance would cause request ID collisions
  // when multiple clients connect concurrently.

  try {
    const transport: StreamableHTTPServerTransport = new StreamableHTTPServerTransport({
      sessionIdGenerator: undefined,
    });
    response.on('close', async () => {
      console.log('Request closed');
      await transport.close();
      await server.close();
    });
    await server.connect(transport);
    await transport.handleRequest(request, response, request.body);
  } catch (error) {
    console.error('Error handling MCP request:', error);
    if (!response.headersSent) {
      response.status(500).json({
        jsonrpc: '2.0',
        error: {
          code: -32_603,
          message: 'Internal server error',
        },
        id: null,
      });
    }
  }
});

// SSE notifications not supported in stateless mode
app.get('/', async (request: Request, response: Response) => {
  console.log('Received GET MCP request');
  response.writeHead(405).end(
    JSON.stringify({
      jsonrpc: '2.0',
      error: {
        code: -32_000,
        message: 'Method not allowed.',
      },
      id: null,
    })
  );
});

// Session termination not needed in stateless mode
app.delete('/', async (request: Request, response: Response) => {
  console.log('Received DELETE MCP request');
  response.writeHead(405).end(
    JSON.stringify({
      jsonrpc: '2.0',
      error: {
        code: -32_000,
        message: 'Method not allowed.',
      },
      id: null,
    })
  );
});

app.listen(PORT);
Run the server with:
npm startInspect the MCP server
Clone and run MCP inspector
Now that we have the MCP server running, we can use the MCP inspector to see if tools are available.
The official MCP inspector v0.16.2 has some bugs that affect authentication functionality. To address these issues, we've created a patched version of the MCP inspector that includes necessary fixes for OAuth/OIDC authentication flows. We've also submitted pull requests to the official repository to contribute these fixes upstream.
To run the MCP inspector, you can use the following command (Node.js is required):
git clone https://github.com/mcp-auth/inspector.git -b patch/0.16.2-fixes
cd inspector
npm install
npm run dev
Then, open your browser and navigate to http://localhost:6274/ (or other URL shown in the terminal) to access the MCP inspector.
Connect MCP inspector to the MCP server
Before we proceed, check the following configuration in MCP inspector:
- Transport Type: Set to
Streamable HTTP. - URL: Set to the URL of your MCP server. In our case, it should be
http://localhost:3001.
Now you can click the "Connect" button to see if the MCP inspector can connect to the MCP server. If everything is okay, you should see the "Connected" status in the MCP inspector.
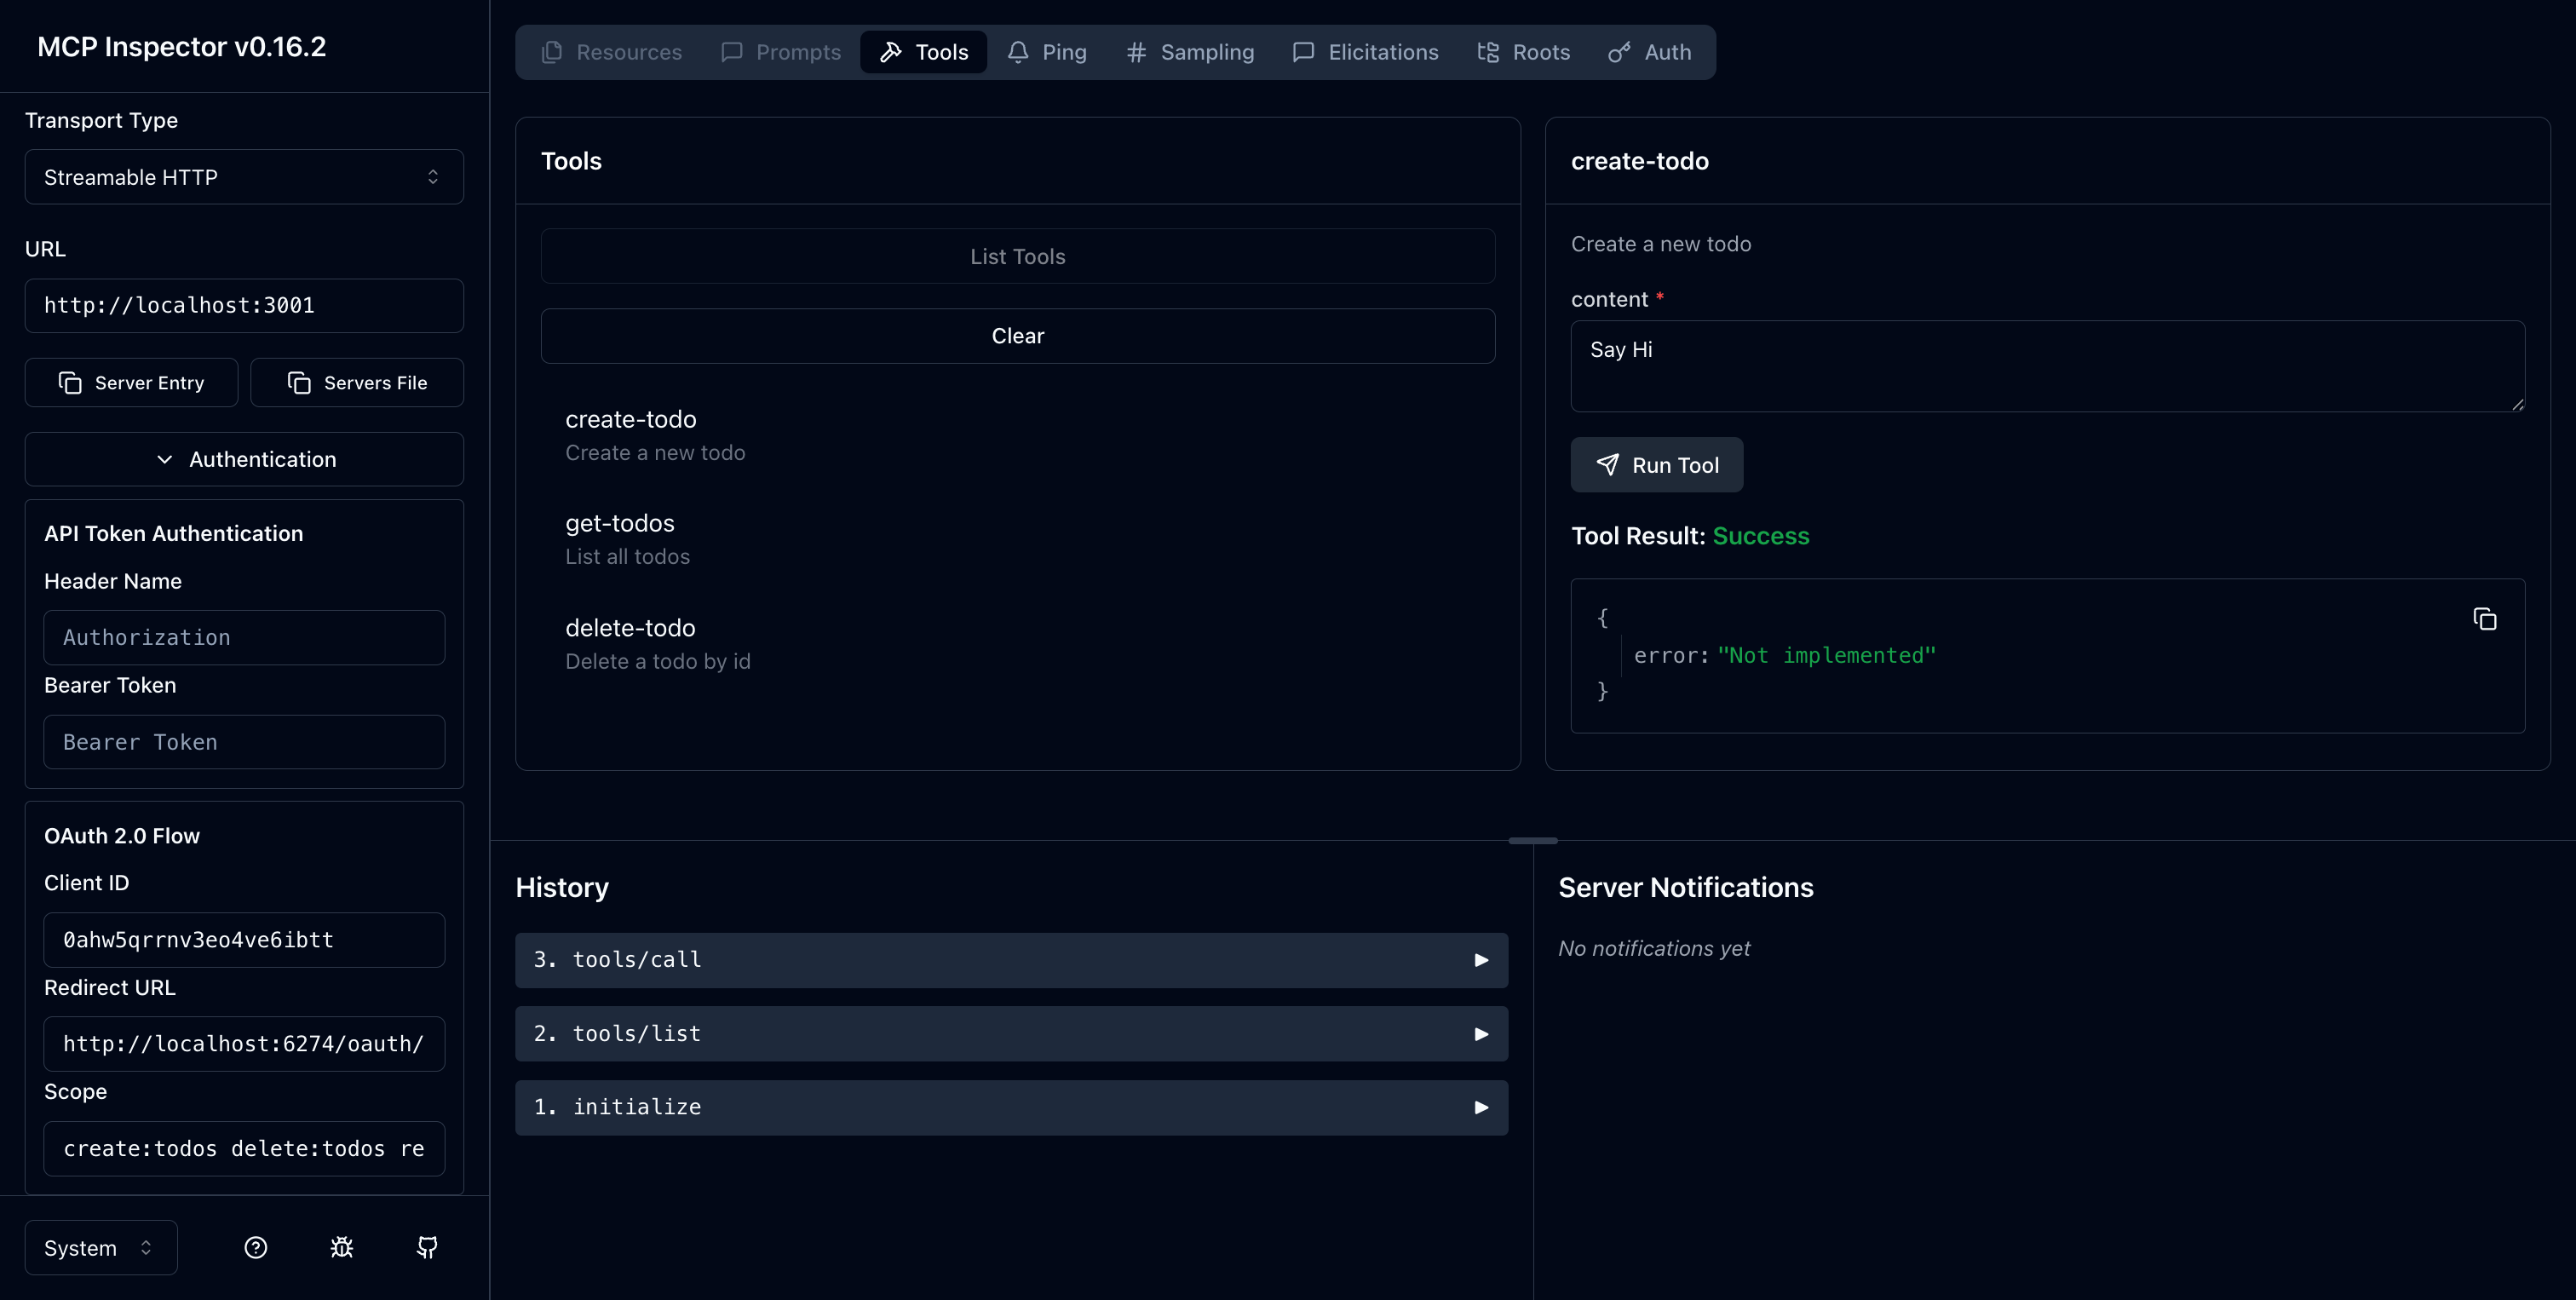
Checkpoint: Run todo manager tools
- In the top menu of the MCP inspector, click on the "Tools" tab.
- Click on the "List Tools" button.
- You should see the
create-todo,get-todos, anddelete-todotools listed on the page. Click on it to open the tool details. - You should see the "Run Tool" button in the right side. Click on it and enter required parameters to run the tool.
- You should see the tool result with the JSON response
{"error": "Not implemented"}.
Integrate with your authorization server
To complete this section, there are several considerations to take into account:
The issuer URL of your authorization server
This is usually the base URL of your authorization server, such as https://auth.example.com. Some providers may have a path like https://example.logto.app/oidc, so make sure to check your provider's documentation.
How to retrieve the authorization server metadata
- If your authorization server conforms to the OAuth 2.0 Authorization Server Metadata or OpenID Connect Discovery, you can use the MCP Auth built-in utilities to fetch the metadata automatically.
- If your authorization server does not conform to these standards, you will need to manually specify the metadata URL or endpoints in the MCP server configuration. Check your provider's documentation for the specific endpoints.
How to register the MCP inspector as a client in your authorization server
- If your authorization server supports Dynamic Client Registration, you can skip this step as the MCP inspector will automatically register itself as a client.
- If your authorization server does not support Dynamic Client Registration, you will need to manually register the MCP inspector as a client in your authorization server.
Understand token request parameters
When requesting access tokens from different authorization servers, you'll encounter various approaches for specifying the target resource and permissions. Here are the main patterns:
-
Resource indicator based:
- Uses the
resourceparameter to specify the target API (see RFC 8707: Resource Indicators for OAuth 2.0) - Common in modern OAuth 2.0 implementations
- Example request:
{ "resource": "http://localhost:3001", "scope": "create:todos read:todos" } - The server issues tokens specifically bound to the requested resource
- Uses the
-
Audience based:
- Uses the
audienceparameter to specify the intended token recipient - Similar to resource indicators but with different semantics
- Example request:
{
  "audience": "todo-api",
  "scope": "create:todos read:todos"
}
- Uses the
-
Pure scope based:
- Relies solely on scopes without resource/audience parameters
- Traditional OAuth 2.0 approach
- Example request:
{ "scope": "todo-api:create todo-api:read openid profile" } - Often uses prefixed scopes to namespace permissions
- Common in simpler OAuth 2.0 implementations
- Check your provider's documentation for supported parameters
- Some providers support multiple approaches simultaneously
- Resource indicators provide better security through audience restriction
- Consider using resource indicators when available for better access control
While each provider may have its own specific requirements, the following steps will guide you through the process of integrating the MCP inspector and MCP server with provider-specific configurations.
Register MCP inspector as a client
- Logto
- OAuth 2.0 / OIDC
Integrating the todo manager with Logto is straightforward as it's an OpenID Connect provider that supports resource indicators and scopes, allowing you to secure your todo API with http://localhost:3001 as the resource indicator.
Since Logto does not support Dynamic Client Registration yet, you will need to manually register the MCP inspector as a client in your Logto tenant:
- Open your MCP inspector, go to the Authentication configuration and click on the "OAuth2.0 Flow" configuration. Copy the Redirect URI value, which should be something like
http://localhost:6274/oauth/callback. - Sign in to Logto Console (or your self-hosted Logto Console).
- Navigate to the "Applications" tab, click on "Create application". In the bottom of the page, click on "Create app without framework".
- Fill in the application details, then click on "Create application":
- Select an application type: Choose "Single-page application".
- Application name: Enter a name for your application, e.g., "MCP Inspector".
- In the "Settings / Redirect URIs" section, paste the Redirect URI value you copied from the MCP inspector. Then click on "Save changes" in the bottom bar.
- In the top card, you will see the "App ID" value. Copy it.
- Go back to the MCP inspector and paste the "App ID" value in the Authentication configuration under "OAuth2.0 Flow" in the "Client ID" field.
- In the "Scope" field, enter:
create:todos read:todos delete:todos. This will ensure that the access token returned by Logto contains the necessary scopes to access the todo manager.
This is a generic OAuth 2.0 / OpenID Connect provider integration guide. Both OAuth 2.0 and OIDC follow similar steps as OIDC is built on top of OAuth 2.0. Check your provider's documentation for specific details.
If your provider supports Dynamic Client Registration, you can directly go to step 8 below to configure the MCP inspector; otherwise, you will need to manually register the MCP inspector as a client:
-
Open your MCP inspector, go to the Authentication configuration and click on the "OAuth2.0 Flow" configuration. Copy the Redirect URI value, which should be something like
http://localhost:6274/oauth/callback. -
Sign in to your provider's console.
-
Navigate to the "Applications" or "Clients" section, then create a new application or client.
-
If your provider requires a client type, select "Single-page application" or "Public client".
-
After creating the application, you will need to configure the redirect URI. Paste the Redirect URI value you copied from the MCP inspector.
-
Find the "Client ID" or "Application ID" of the newly created application and copy it.
-
Go back to the MCP inspector and paste the "Client ID" value in the Authentication configuration under "OAuth2.0 Flow" in the "Client ID" field.
-
In the "Scope" field, enter the following scopes to request the necessary permissions for todo operations:
create:todos read:todos delete:todosSet up MCP auth
In your MCP server project, you need to install the MCP Auth SDK and configure it to use your authorization server metadata.
MCP Auth requires the authorization server metadata to be able to initialize. Depending on your provider:
- Logto
- OAuth 2.0 / OIDC
The issuer URL can be found in your application details page in Logto Console, in the "Endpoints & Credentials / Issuer endpoint" section. It should look like https://my-project.logto.app/oidc.
- Node.js
Update the todo-manager.ts to include the MCP Auth configuration:
import { MCPAuth, fetchServerConfig } from 'mcp-auth';

const authIssuer = '<issuer-endpoint>'; // Replace with your issuer endpoint
const mcpAuth = new MCPAuth({
  server: await fetchServerConfig(authIssuer, { type: 'oidc' }),
});
For OAuth 2.0 providers, you'll need to:
- Check your provider's documentation for the authorization server URL (often called issuer URL or base URL)
- Some providers may expose this at
https://{your-domain}/.well-known/oauth-authorization-server - Look in your provider's admin console under OAuth/API settings
- Node.js
Update the todo-manager.ts to include the MCP Auth configuration:
import { MCPAuth, fetchServerConfig } from 'mcp-auth';

const authIssuer = '<issuer-endpoint>'; // Replace with your issuer endpoint
const mcpAuth = new MCPAuth({
  server: await fetchServerConfig(authIssuer, { type: 'oauth' }), // or { type: 'oidc' }
});
In some cases, the provider response may be malformed or not conforming to the expected metadata format. If you are confident that the provider is compliant, you can transpile the metadata via the config option:
- Node.js
const mcpAuth = new MCPAuth({
  server: await fetchServerConfig(authIssuer, {
    // ...other options
    transpileData: (data) => ({ ...data, response_types_supported: ['code'] }),
  }),
});If your provider does not support OAuth 2.0 Authorization Server Metadata, you can manually specify the metadata URL or endpoints. Check Other ways to initialize MCP Auth for more details.
- Node.js
Create a .env file in your project root to store the authorization server configuration:
MCP_AUTH_ISSUER=<your-issuer-endpoint>Replace <your-issuer-endpoint> with your actual issuer endpoint (e.g., https://my-project.logto.app/oidc).
Update MCP server
We are almost done! It's time to update the MCP server to apply the MCP Auth route and middleware function, then implement the permission-based access control for the todo manager tools based on the user's scopes.
- Node.js
Now update the complete todo-manager.ts file with the authentication and authorization logic:
import assert from 'node:assert';

import { type AuthInfo } from '@modelcontextprotocol/sdk/server/auth/types.js';
import { McpServer } from '@modelcontextprotocol/sdk/server/mcp.js';
import { StreamableHTTPServerTransport } from '@modelcontextprotocol/sdk/server/streamableHttp.js';
import { configDotenv } from 'dotenv';
import express, { type Request, type Response } from 'express';
import { fetchServerConfig, MCPAuth, MCPAuthBearerAuthError } from 'mcp-auth';
import { z } from 'zod';

import { TodoService } from './todo-service.js';

configDotenv();

const todoService = new TodoService();

const assertUserId = (authInfo?: AuthInfo) => {
  const { subject } = authInfo ?? {};
  assert(subject, 'Invalid auth info');
  return subject;
};

const hasRequiredScopes = (userScopes: string[], requiredScopes: string[]): boolean => {
  return requiredScopes.every((scope) => userScopes.includes(scope));
};

// Create an MCP server
const server = new McpServer({
  name: 'Todo Manager',
  version: '0.0.0',
});

server.tool(
  'create-todo',
  'Create a new todo',
  { content: z.string() },
  ({ content }: { content: string }, { authInfo }) => {
    const userId = assertUserId(authInfo);

    /**
     * Only users with 'create:todos' scope can create todos
     */
    if (!hasRequiredScopes(authInfo?.scopes ?? [], ['create:todos'])) {
      throw new MCPAuthBearerAuthError('missing_required_scopes');
    }

    const createdTodo = todoService.createTodo({ content, ownerId: userId });

    return {
      content: [{ type: 'text', text: JSON.stringify(createdTodo) }],
    };
  }
);

server.tool('get-todos', 'List all todos', ({ authInfo }) => {
  const userId = assertUserId(authInfo);

  /**
   * If user has 'read:todos' scope, they can access all todos (todoOwnerId = undefined)
   * If user doesn't have 'read:todos' scope, they can only access their own todos (todoOwnerId = userId)
   */
  const todoOwnerId = hasRequiredScopes(authInfo?.scopes ?? [], ['read:todos'])
    ? undefined
    : userId;

  const todos = todoService.getAllTodos(todoOwnerId);

  return {
    content: [{ type: 'text', text: JSON.stringify(todos) }],
  };
});

server.tool(
  'delete-todo',
  'Delete a todo by id',
  { id: z.string() },
  ({ id }: { id: string }, { authInfo }) => {
    const userId = assertUserId(authInfo);

    const todo = todoService.getTodoById(id);

    if (!todo) {
      return {
        content: [{ type: 'text', text: JSON.stringify({ error: 'Failed to delete todo' }) }],
      };
    }

    /**
     * Users can only delete their own todos
     * Users with 'delete:todos' scope can delete any todo
     */
    if (todo.ownerId !== userId && !hasRequiredScopes(authInfo?.scopes ?? [], ['delete:todos'])) {
      return {
        content: [
          {
            type: 'text',
            text: JSON.stringify({ error: 'Failed to delete todo' }),
          },
        ],
      };
    }

    const deletedTodo = todoService.deleteTodo(id);

    return {
      content: [
        {
          type: 'text',
          text: JSON.stringify({
            message: `Todo ${id} deleted`,
            details: deletedTodo,
          }),
        },
      ],
    };
  }
);

const { MCP_AUTH_ISSUER } = process.env;

if (!MCP_AUTH_ISSUER) {
  throw new Error('MCP_AUTH_ISSUER environment variable is required');
}

const resourceIdentifier = 'http://localhost:3001';

const authServerConfig = await fetchServerConfig(MCP_AUTH_ISSUER, { type: 'oidc' });

const mcpAuth = new MCPAuth({
  protectedResources: {
    metadata: {
      resource: resourceIdentifier,
      authorizationServers: [authServerConfig],
      scopesSupported: ['create:todos', 'read:todos', 'delete:todos'],
    },
  },
});

const PORT = 3001;
const app = express();

app.use(mcpAuth.protectedResourceMetadataRouter());
app.use(
  mcpAuth.bearerAuth('jwt', {
    resource: resourceIdentifier,
    audience: resourceIdentifier,
  })
);

// Below is the boilerplate code from MCP SDK documentation
app.post('/', async (request: Request, response: Response) => {
  // In stateless mode, create a new instance of transport and server for each request
  // to ensure complete isolation. A single instance would cause request ID collisions
  // when multiple clients connect concurrently.

  try {
    const transport: StreamableHTTPServerTransport = new StreamableHTTPServerTransport({
      sessionIdGenerator: undefined,
    });
    response.on('close', async () => {
      console.log('Request closed');
      await transport.close();
      await server.close();
    });
    await server.connect(transport);
    await transport.handleRequest(request, response, request.body);
  } catch (error) {
    console.error('Error handling MCP request:', error);
    if (!response.headersSent) {
      response.status(500).json({
        jsonrpc: '2.0',
        error: {
          code: -32_603,
          message: 'Internal server error',
        },
        id: null,
      });
    }
  }
});

// SSE notifications not supported in stateless mode
app.get('/', async (request: Request, response: Response) => {
  console.log('Received GET MCP request');
  response.writeHead(405).end(
    JSON.stringify({
      jsonrpc: '2.0',
      error: {
        code: -32_000,
        message: 'Method not allowed.',
      },
      id: null,
    })
  );
});

// Session termination not needed in stateless mode
app.delete('/', async (request: Request, response: Response) => {
  console.log('Received DELETE MCP request');
  response.writeHead(405).end(
    JSON.stringify({
      jsonrpc: '2.0',
      error: {
        code: -32_000,
        message: 'Method not allowed.',
      },
      id: null,
    })
  );
});

app.listen(PORT);
Create the todo-service.ts file with the Todo service implementation:
// todo-service.ts

type Todo = {
  id: string;
  content: string;
  ownerId: string;
  createdAt: string;
};

/**
 * A simple Todo service for demonstration purposes.
 * Use an in-memory array to store todos
 */
export class TodoService {
  private readonly todos: Todo[] = [];

  getAllTodos(ownerId?: string): Todo[] {
    if (ownerId) {
      return this.todos.filter((todo) => todo.ownerId === ownerId);
    }
    return this.todos;
  }

  getTodoById(id: string): Todo | undefined {
    return this.todos.find((todo) => todo.id === id);
  }

  createTodo({ content, ownerId }: { content: string; ownerId: string }): Todo {
    const todo: Todo = {
      id: this.genId(),
      content,
      ownerId,
      createdAt: new Date().toISOString(),
    };

    // eslint-disable-next-line @silverhand/fp/no-mutating-methods
    this.todos.push(todo);
    return todo;
  }

  deleteTodo(id: string): Todo | undefined {
    const index = this.todos.findIndex((todo) => todo.id === id);

    if (index === -1) {
      return undefined;
    }

    // eslint-disable-next-line @silverhand/fp/no-mutating-methods
    const [deleted] = this.todos.splice(index, 1);
    return deleted;
  }

  private genId(): string {
    return Math.random().toString(36).slice(2, 10);
  }
}
The complete implementation above includes all the authentication and authorization logic. You can also check our sample code for reference.
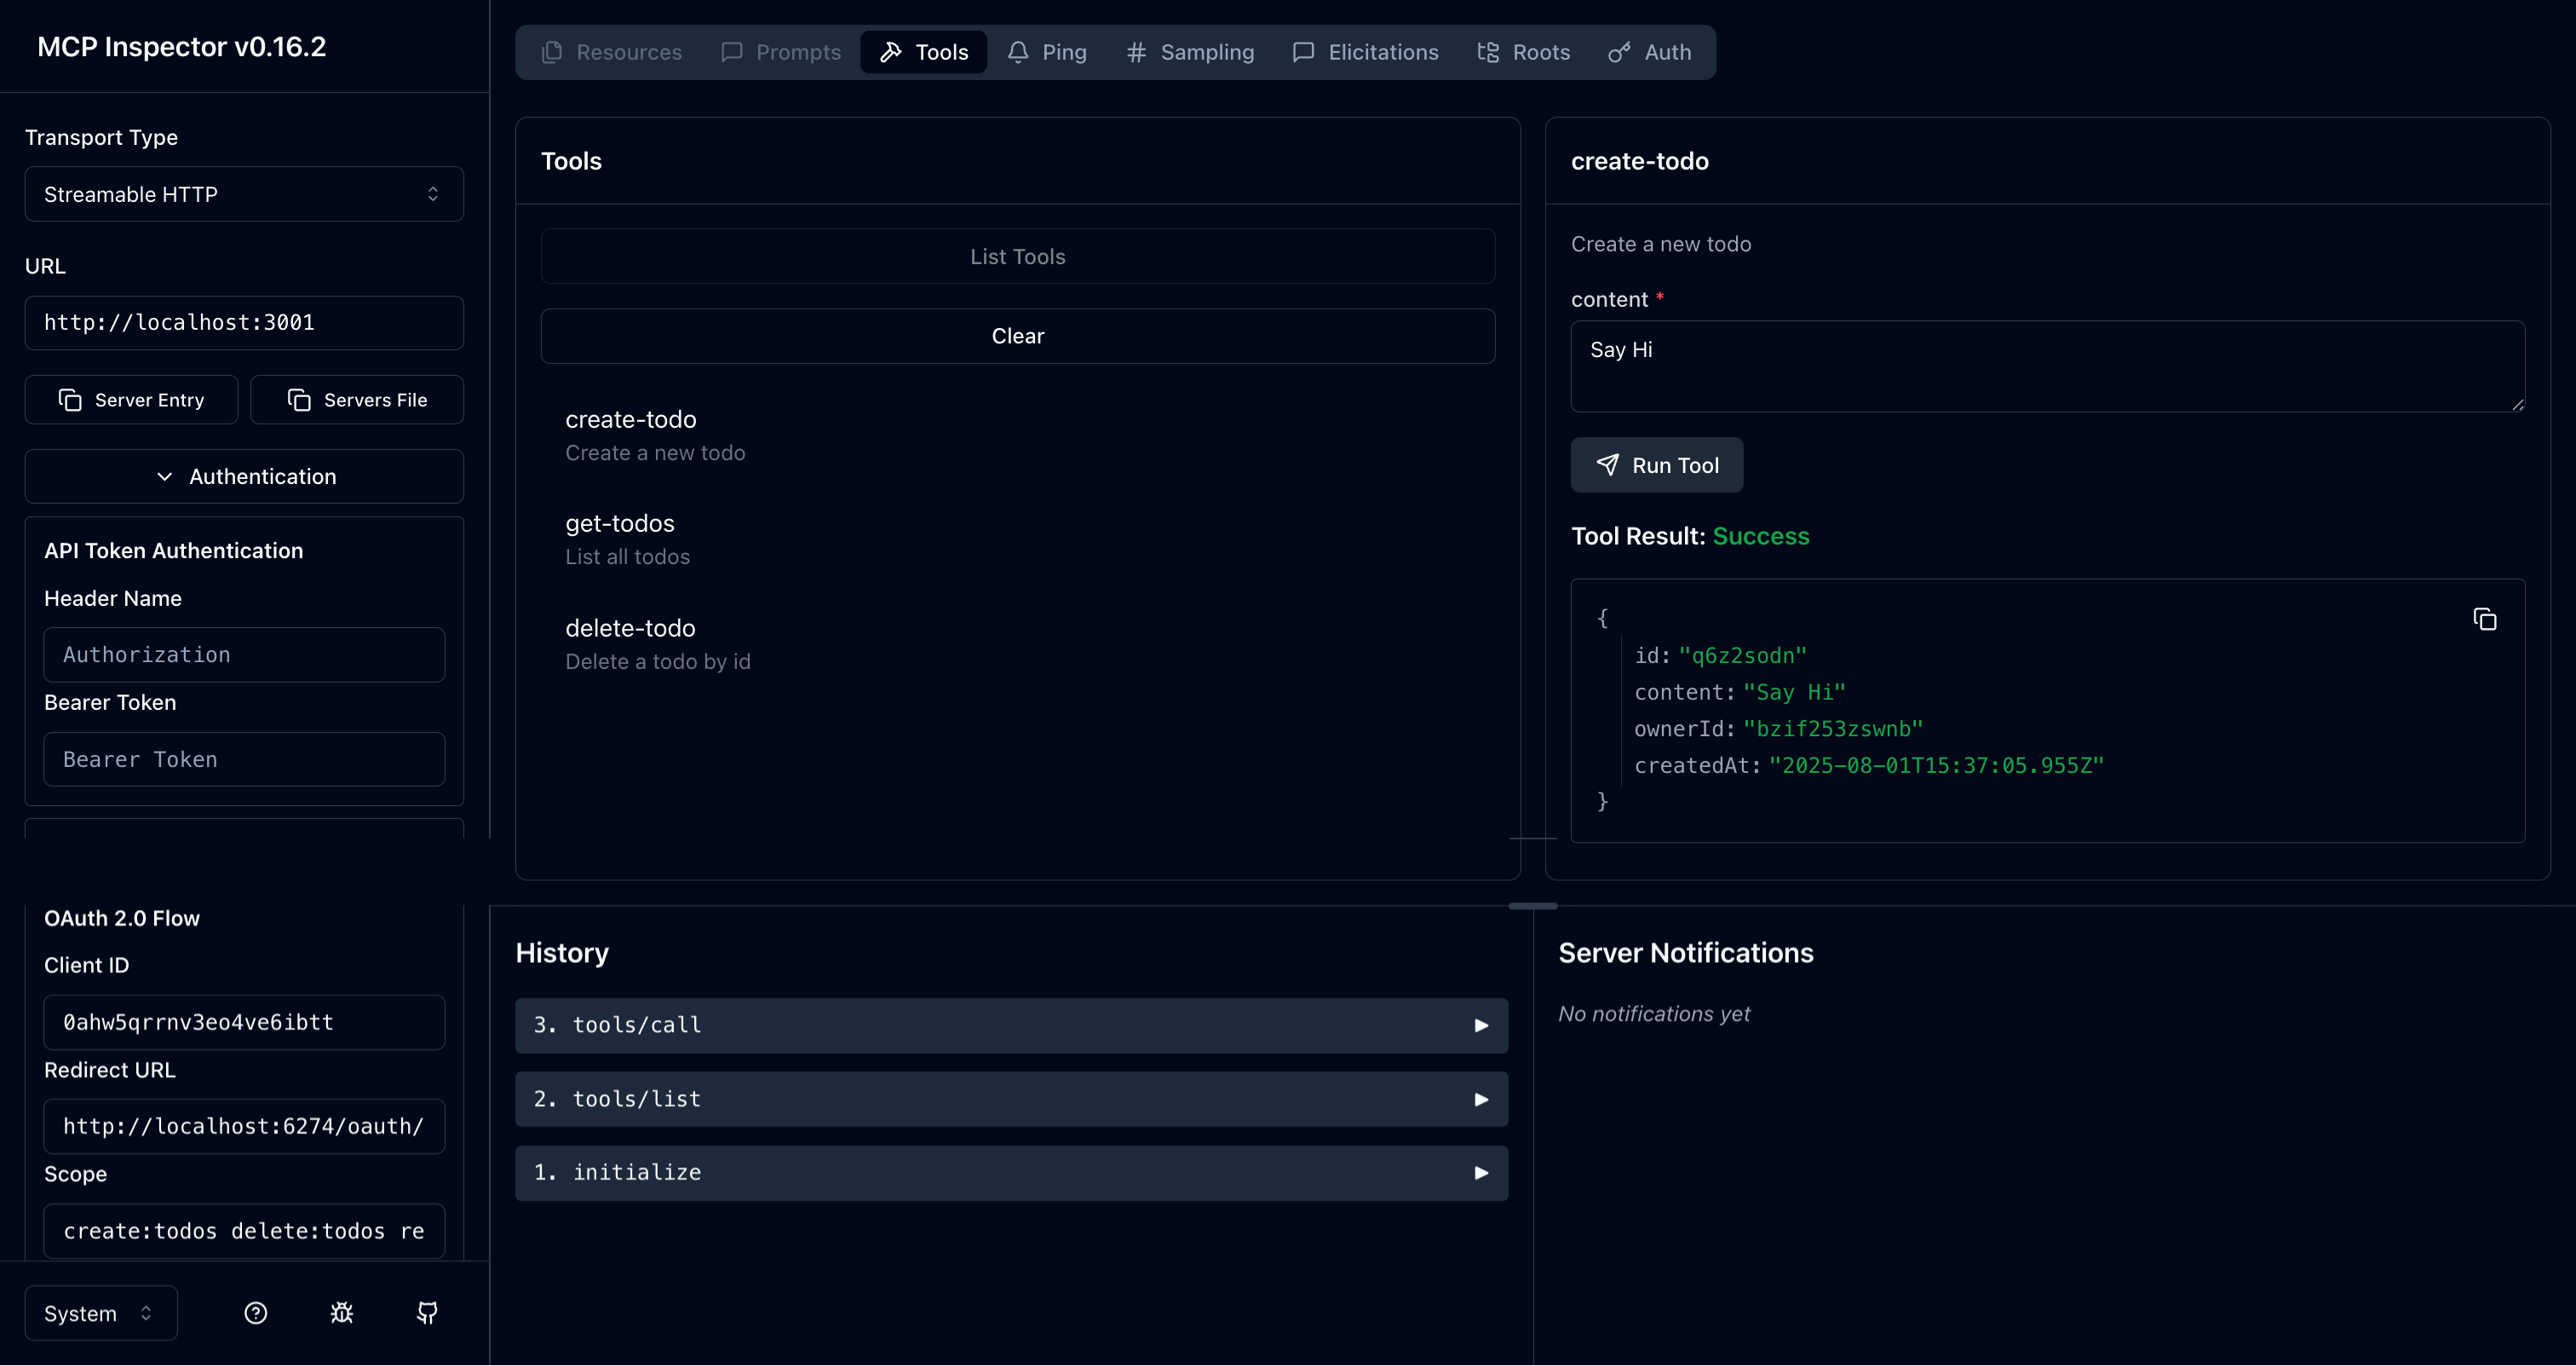
Checkpoint: Run the todo-manager tools
Restart your MCP server and open the MCP inspector in your browser. When you click the "Connect" button, you should be redirected to your authorization server's sign-in page.
Once you sign in and back to the MCP inspector, repeat the actions we did in the previous checkpoint to run todo manager tools. This time, you can use these tools with your authenticated user identity. The behavior of the tools will depend on the roles and permissions assigned to your user:
-
If you're logged in as a User (with only
create:todosscope):- You can create new todos using the
create-todotool - You can only view and delete your own todos
- You won't be able to see or delete other users' todos
- You can create new todos using the
-
If you're logged in as an Admin (with all scopes:
create:todos,read:todos,delete:todos):- You can create new todos
- You can view all todos in the system using the
get-todostool - You can delete any todo using the
delete-todotool, regardless of who created it
You can test these different permission levels by:
- Signing out of the current session (click the "Disconnect" button in MCP inspector)
- Signing in with a different user account that has different roles/permissions
- Trying the same tools again to observe how the behavior changes based on the user's permissions
This demonstrates how role-based access control (RBAC) works in practice, where different users have different levels of access to the system's functionality.
- Node.js
Check out the MCP Auth Node.js SDK repository for the complete code of the MCP server (OIDC version).
Closing notes
🎊 Congratulations! You have successfully completed the tutorial. Let's recap what we've done:
- Setting up a basic MCP server with todo management tools (
create-todo,get-todos,delete-todo) - Implementing role-based access control (RBAC) with different permission levels for users and admins
- Integrating the MCP server with an authorization server using MCP Auth
- Configuring the MCP Inspector to authenticate users and use access tokens with scopes to call tools
Be sure to check out other tutorials and documentation to make the most of MCP Auth.